How Do You Upload Photos to Instagram From Pc
A billion people use Instagram worldwide and over 95 million photos are uploaded every single day (statistics from 2016). I can't even imagine the sheer number of images posted on Instagram each minute today in 2021. Must be a daunting number I am sure.
Seriously how many zeros after a number do you think it actually is?
This amount of data uploaded at this fast a frequency requires a serious degree of data management and some cut corners.
Wait, But Why?
It really isn't a secret at all.
Instagram is a service which is primarily used on smartphones.
Most people with smartphones have limited data and slower Internet speeds as compared to wired Internet.
So basically, if they let the images upload and then served to the user atfull resolution it will require a HUGE amount of data and time to do it.
The user experience would not be as fluid and seamless as you have it now and it might just also crash pretty damn frequently.
So what's the workaround?
Yes, you guessed it right….image compression!
Instagram has a proprietary algorithm which it uses to compress images into as small bundles as possible. Smaller data packets to serve equals less stress on the servers, faster load times and a far better user experience.
Of course, Instagram doesn't want and butcher your images to a state where even you don't recognize them anymore but then it does apply the SAME algorithm to ALL the images uploaded. And sometimes this does affect some photos more than the others.
Problems range from subtle color change (reds suddenly look like orange) to very drastic resolution differences. You don't want that, do you?
You have probably spent a fortune on the camera that you used to take the image. Then invested so much time and effort to perfect it in post. Why in the world would you allow all this effort to go down the drain and allow Insta to just compress your photograph into oblivion for its own sake?
What if I tell you, you don't have to.
Seriously!
All you have to do is follow the steps below and you can just be able to beat Instagram's radar and sneak in all the high-quality image goodness you have for the world.
Let The Smuggling Begin
Color Space: You have to deal with this only if you shoot using a DSLR or a Mirrorless camera. Cellphone shooters need not worry about this step at all.
As soon as you import the image into your editing software, change the image color space to sRGB (standard Red Green Blue). This is the color space which is most widely used for nearly all web pages and application. And Instagram is no exception.
You want to do this as soon as possible. Before you start editing the image. This is important.
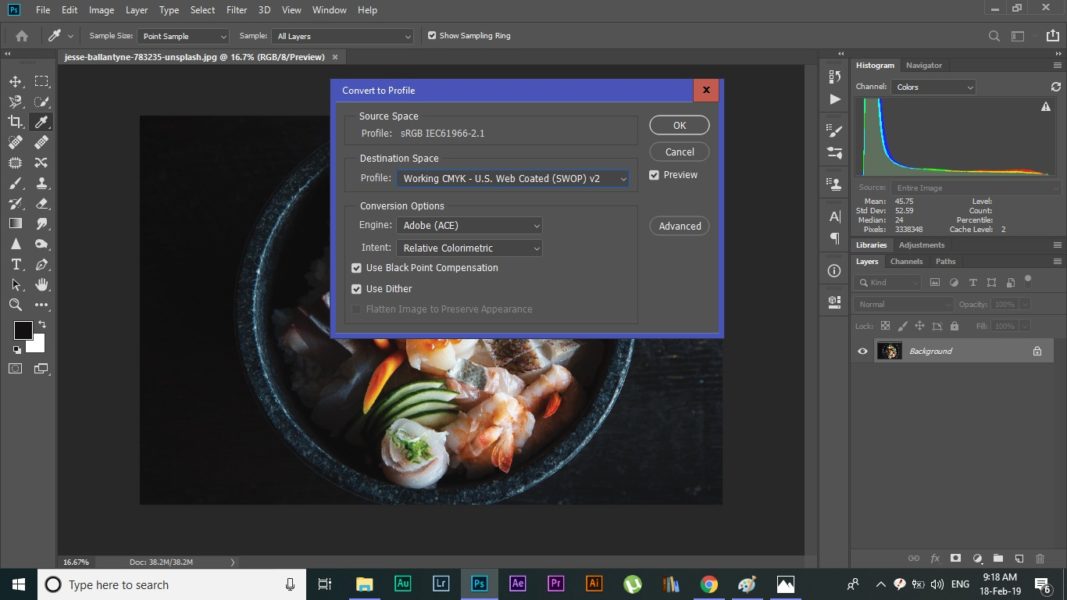
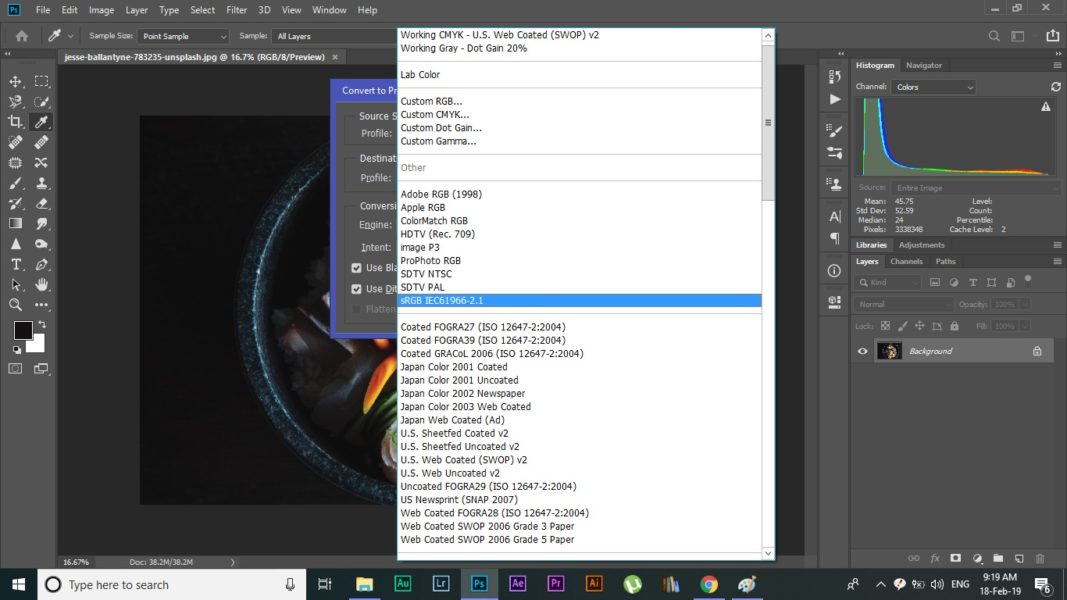
Here is how you can change it in Photoshop CC 2019 (it is exactly the same for all older versions of Photoshop):
Go to Edit > Convert to Profile.
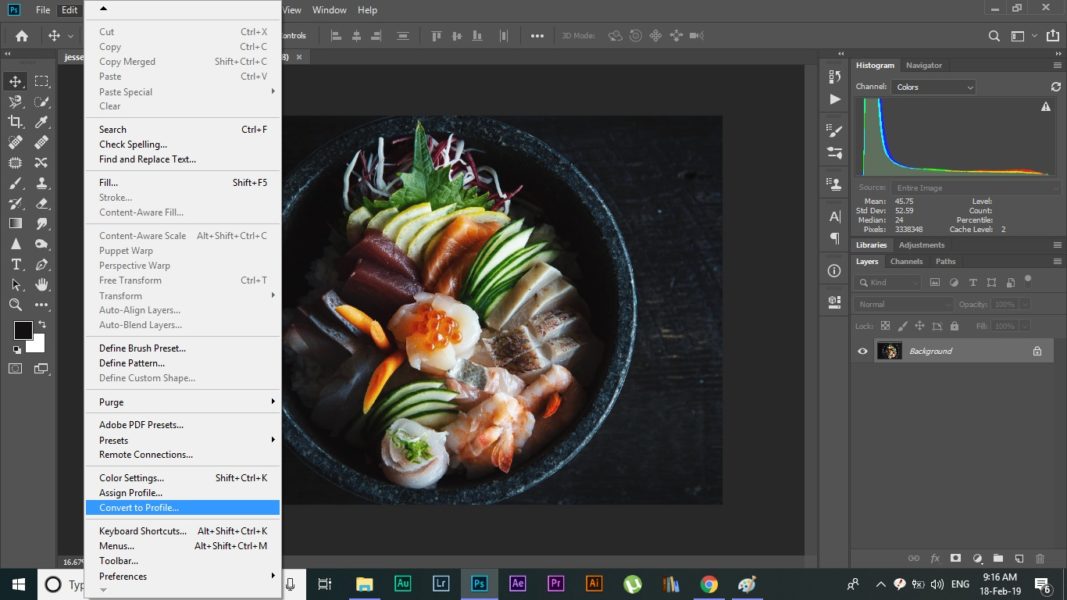
Click on Profile and choose sRGB from the drop-down list.
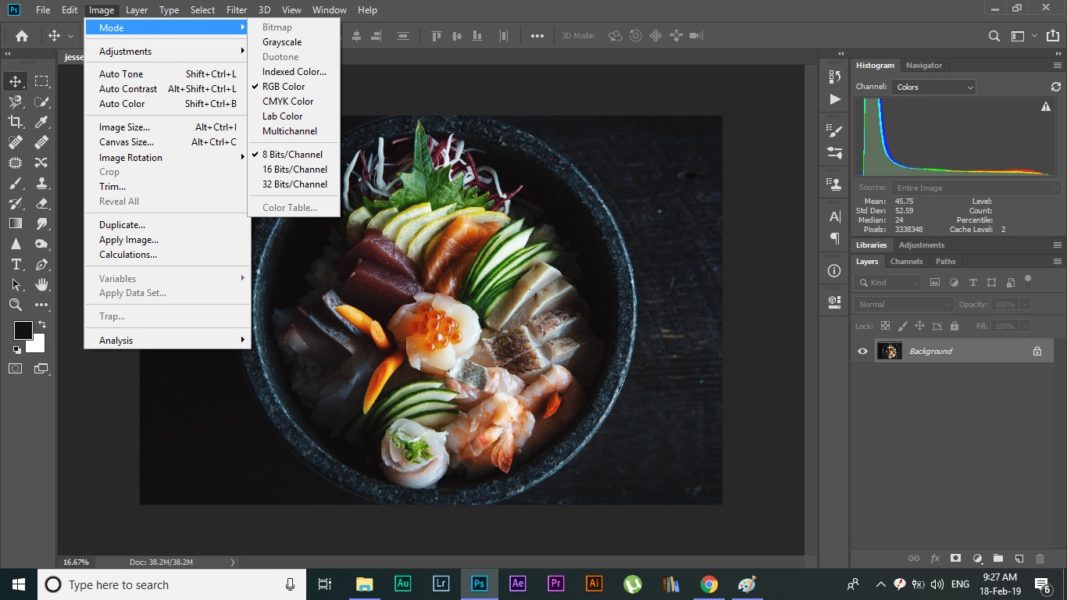
Bit Depth Configuration:Without getting too technical about this, let me just explain this to you as simply as possible. Bit depth essentially determines the number of tones depicted in your image.
Am sure you are aware that every single color has many tones. So when I say 'blue', it can mean any of the following color tones below.

Instagram allows at most 8bit colored photos. So, in case, your camera takes an image which is of a higher bit depth say 10bit or more, you want to bring it down to 8bit.
Here is how you can do it in Photoshop CC 2019.
Go to Image > Mode > 8Bit/Channel. You can double check here if your image is converted to sRGB.
Edit Now
Once you have dialed in the 'correct' color space and bit depth for the image, you can go ahead and edit it to your heart's content.

Play with the sliders, go crazy and just make your images look fantastic.
Pro tip:
-
- Keep in mind Instagram's UI color:Instagram uses a white user interface. This means that all your images would be viewed against a white background. You may not have given it much thought but images do look starkly different when viewed on a different colored background. So, if possible, change the background of your editing software to white to better visualize how your image would finally look like. However, if you cannot change the background color for any reason. Once you are done editing, make sure you save the edited file and then find a way to look at it over a white background before finally pulling the trigger on it. This may seem time-consuming but trust me, this would be totally worth it in the long run.
-
Dimension check:Most people looking at your image on Instagram will not use a large monitor but a much smaller cell phone. Your editing the image on a larger screen may also sometimes create a disconnect between what you see on the large screen and what your audience sees on their phone. To best resolve this problem, zoom out and get the image on your screen roughly the size of the image as it would appear on a phone and then compare. You may open up an image on Instagram on your phone and use it as a reference for the size.
Crop
Instagram supports two aspect ratios for the images on the app. They are 1.91:1 and 4:5.
Any image which does not fit these ratios exactly will be automatically cropped to the nearest value. Please don't let that happen and let Instagram decide what you want and do not want to keep in your photo. Help yourself, do it manually.
Because of the ratios specified above, typically photos taken in portrait orientation lend itself better to be shared on the app than landscape-oriented ones.
An average Instagram user follows around 750 people. It is a staggering number.
That means your image is competing with a heck lot of photographs for attention. So logic dictates you use the most amount of real estate you can, to make the best possible impression. Using the 4:5 ratio, therefore, becomes the obvious choice.
Either of the two prescribed ratios also makes the grid view of your profile look seamless and complete.
Final Export
If you have followed all the suggestions I gave you till now, exporting the image should be pretty straightforward and fuss-free.
You just need to check on four main settings now.
- Image file format: Set it to Jpg.
- Quality: Roughly 80% is plenty fine.
- Image size: Set the width to 1080 pixels and the height should adjust automatically to maintain the aspect ratio.
- Color space: sRGB (this wouldn't alter anything at all if you already configured the color space before, it only acts as a check at this point)
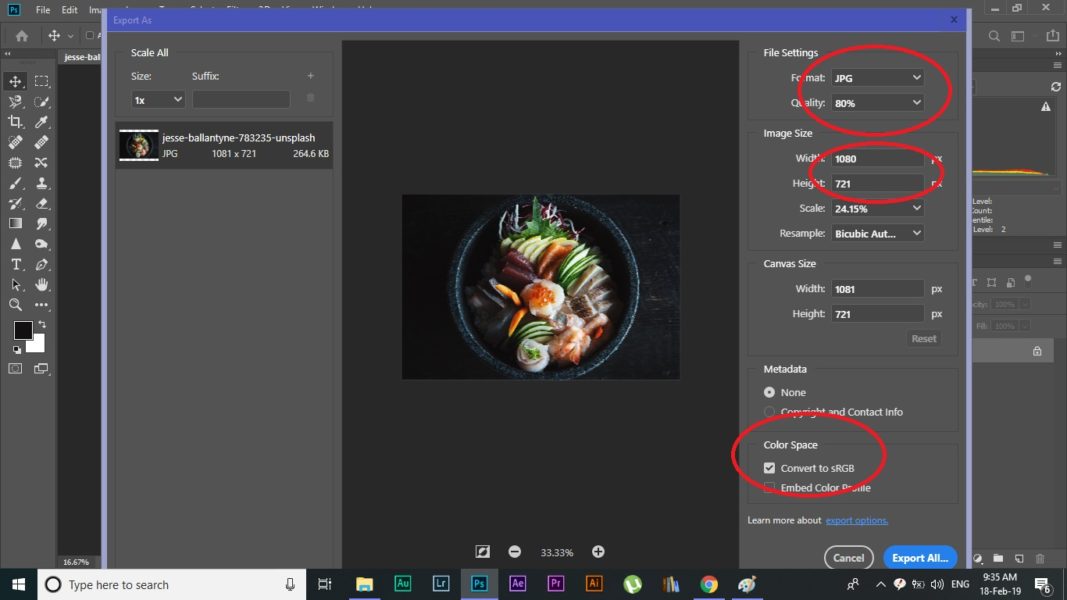
Export the image……done!
Your image is now all ready and geared up to be uploaded to Insta and rock the place.
If you edited the photo on your computer, you will have to go through the pain of sending it to your phone before finally uploading it. Or do you?
I found a way around this problem too. And it requires nothing extra at all.
All you need to do is use the Chrome browser. Which I assume you do already.
To upload the image from your computer directly to Instagram follow the illustrated steps below:
- Log into Instagram on your computer.
- Once you are in, press the F12 key on your keyboard.
- Refresh the window and voilà, you should now be looking at the Instagram mobile version on your freaking desktop/laptop. Isn't that amazing?
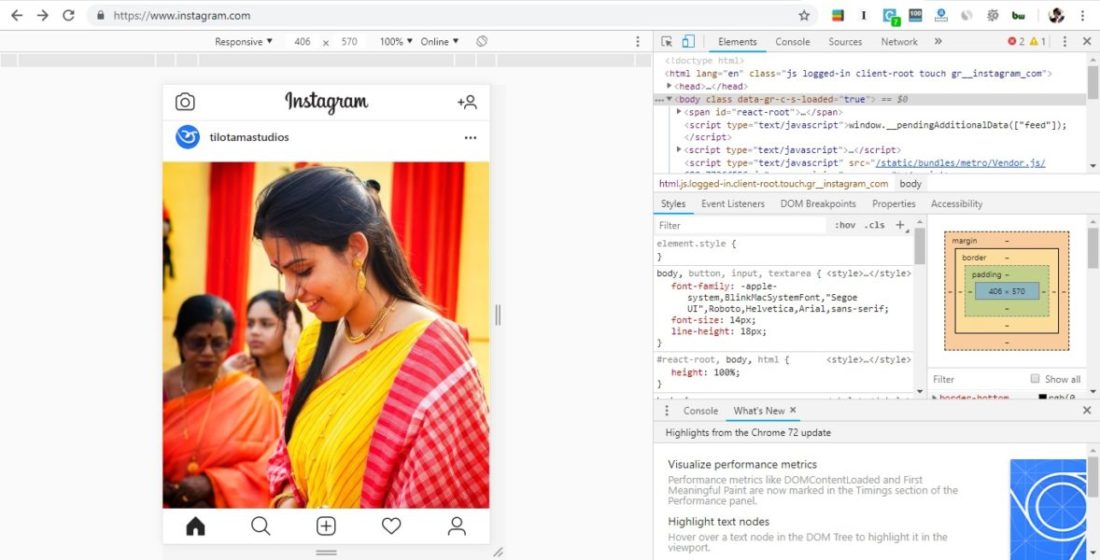
I believe you know the rest. Just press the '+' sign at the center and choose the image you want to upload.
Okay, before wrapping this up, I got one last tip that may come in handy.
This is is a bit of an overkill but doesn't require much, so you might as well give it a try sometime.
Create a 'demo/experiment' account for yourself. You can obviously name it anything you like. Make this a private account. No one needs to see this.
Considering your actual account has a good amount of followers already, you may not want to post an image, find some fault with it and then withdraw it later.
![The Only Guide You Need To Master Digital Camera Autofocusing [Part 2]](https://www.aperturebuzz.com/wp-content/uploads/2020/03/daniel-cheung-dDppsuM_UpE-unsplash-300x200.jpg)
Save yourself a lot of pain and use this new demo account as a staging platform to perform all your checks. Upload any new image on this account first. This will not only tell you how Instagram actuallyhandled your image but also show you visually how your grid looks. An absolutely invaluable thing to have.
Yeah, I am out now. But I promise I will let you know any new tip that I may find later.
Wrap
Like I said earlier, Instagram applies a uniform blanket algorithm to squeeze down any and all images before it is uploaded. The only reason to perform all these steps is to optimize our images the best for Instagram so that the algorithm touches as little of it as possible.
If you just snap a photograph and upload it without performing any of the steps I just asked you to, Insta's algorithm will do it anyway. Which might, in turn, lead to all the problems that you know all too well.
It just takes a few minutes to do it all. If you took such great pain to take the image, edit it, why not spend a few minutes more to get it out perfect, so the person looking at it sees it exactly like you wanted him to.
That's it, folks. That is all you need to know to preserve and upload the best possible quality images to Instagram.
Till next time. Keep shooting amazing.
This is now a teeny tiny blog trying to compete with the big guys. If you liked what you read, please take a second to share it. It would help me a lot. Thank you.
Hand Picked For You
-
Horizontally-oriented images are a big no no for Instagram. Until now! Here is a...
-
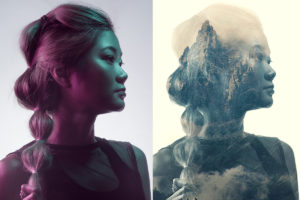
Double exposure images are really amazing. This is how you can create one, using...
-

The secret lies in selecting the yellow teeth perfectly. Once you make a proper ...
-
![How To Remove Tourist From Your Photos Using Photoshop [Really Fast!]](https://www.aperturebuzz.com/wp-content/uploads/2020/01/Image-of-a-girl-at-a-tourist-spot-in-India-without-the-people-around-300x200.jpg)
Removing people from your images is easier than you think and it takes less than...
-

Create an abstract looking Twirl effect in Photoshop using any image in under 2 ...
-

All you need to convert your old film negatives to photographs is a camera, the ...
Algorithm CellPhone CellPhonePhotography EditingSoftware ExportSettings HotTips ImageCompression ImageEditing ImageQuality Instagram LosslessImageCompression Photoshop SocialMedia
How Do You Upload Photos to Instagram From Pc
Source: https://www.aperturebuzz.com/tips-for-high-quality-instagram-photos/
0 Response to "How Do You Upload Photos to Instagram From Pc"
Post a Comment